Monday, December 28, 2009


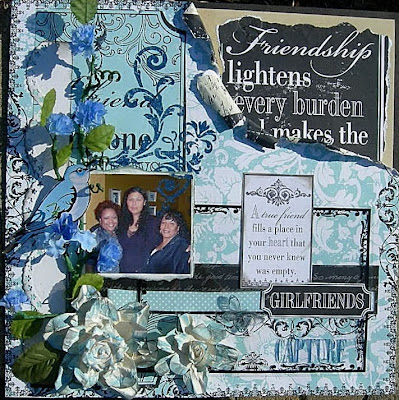
This LO is a gift for my BFF's mother. I left the journaling card blank so she could journal about "V".
"V" is my BFF's six year old daughter who was recently diagnosed with a brain tumor. She is currently under going Chemo. This little girl is so tough and strong, she never complains and keep us all laughing. "V" is a dancer, and dreams of dancing professionally when she grows up. I know I will see this pretty princess dance on broadway someday.
Keep dreaming pretty princess.


How do you define a decade? Is it a single moment in time? A story? A trend? An Invention Or An Event?

The first decade of this new millennium is coming fast to a close and a new decade dawns on us-it is only a few days away.

The first decade of the millennium has brought us blogs, Facebook, MySpace and Twitter, Reality TV, 14,000 songs in a device the size of a credit card- IPod, You-Tube and Talking Cars.

But we also saw the fall of Twin Towers, The DC Sniper, terror alerts, the Iraq and Afghanistan wars, the lowest economy in 40 years, some of the most destructive Tsunamis and Earthquakes ever, two US president deaths, the first US African-American President and Hurricane Katrina.

What moment, trend or story defined this new decade you? Scrap it!

This is for a challenge that I am hosting. I plan to complete a LO in paper. This help get some of my ideas flowing.

If you are interested here is thelink:
http://www.scrapbook.com/forums/showtopic.php?tid/1522569/post/new/#NEW

Sunday, December 20, 2009

Distressed Paper Christmas Poinsettia

Distressed Paper Christmas Poinsettia


Supplies you will need:

1. Durable paper.
2. Scissors
3. Glue
4. Ink pad
5. Wire Cutters
6. Wood Cooking Skewer or Reed Diffuser
7. Floral Wire
8. Floral Tape
9. Floral Sprays

Picture

Step One:

Draw two different size teardrop templates-the size is up to you. Cut out the templates
(These will be your flower petals)

Step Two:
Trace Seven big flower petals and six small flower petals. You should have a total of 13 petals. Now cut out the flower petals.
Image Hosting by PictureTrail.com

Step Three
Cut 13 pieces of wire. Cut each piece of wire 6 inches long.
Image Hosting by PictureTrail.com

Step Four:
Take one large flower petal and turn it over with the wrong side facing you.
Now apply glue to the entire petal.
Image Hosting by PictureTrail.com

Step Five:
Place a piece of the 6 inch floral wire in the middle of the petal and secure again with a drop or two of glue. Next, take another large flower petal and place on top of the flower petal with the floral wire. You will be sandwiching the wire between two large flower petals.
Image Hosting by PictureTrail.com

Step Six:
Smooth the flower petal with your fingers on both sides. You want to remove any air bubbles and secure the edges of the flower petals.

Step Seven:
To distress the edges of the flower petals, this will give the flower more dimension and richness of color. Use an ink pad to ink the edges of the flower petals.
Image Hosting by PictureTrail.com

Step Eight:
Take a piece of 14 inch floral wire and fold in half. Leave a small loop where the wire bends/folds. Now thread three floral sprays through the loop. Once you have the floral sprays through the loop, bend upward and secure with a piece of floral tape.
Image Hosting by PictureTrail.com

Step Nine:
Begin adding small the petals around the floral sprays. As you add a flower petal wrap a piece of floral tape around the bottom of the petal and wire stem. Continue to add all the petals around the floral sprays. Always add petals directly across from each other.
Once you have all the small petals added, repeat the steps with the large 7 flower petals..
A trick to getting floral tape to stick is pulling the tape as you wrap the tape around the wire.
Image Hosting by PictureTrail.com

Step Ten:
Take the Cooking skewer and roll the tips of each petal downward. Once you have rolled
each flower, begin arranging and shaping the flower with your fingers.
Image Hosting by PictureTrail.com

Step Eleven:
Take a yellow permanent marker and run gently across the floral sprays to color the
center of you poinsettia.

End result:
Image Hosting by PictureTrail.com

Sunday, November 29, 2009

Flirting with Fourty


The title says it all. I am just a few years away from the big 40.

Turning 40 is going to be a big milestone. Some say the Big 4-0 is the entry to middle age, and one step closer to old age. But is it also not true that 40 is the new 30? As I approach my fortieth birthday, I have lived and experienced enough to learn from my mistakes, yet young enough to chart a new direction in my life. I am just so blessed to have lived long enough to be Flirting with Forty. There are many who did not have the privilege of reaching their fortieth birthday. I will continue to celebrate the blessings in my life. The next 40 years, I am not going to let the important things pass by like, calling family, forgiving an enemy; I plan to chart a new course for the next 40 birthdays!

This LO is more blue than gray but I can't seem to get the blue to translate to the photo. I started with the design in my Gypsy then cut the masking items from my Cricut. The flowers are a combination of Prima Flowers and my own made vellum flowers stamped with Tim Holtz Alcohol Inks.

Sunday, November 8, 2009

Newest Sketch

Friendship LO

Distressed Paper Flowers

Distressed Paper Flower

Supplies you will need:

1. Durable paper ( scrapbook paper, paper bag cardstock)
For this example, I used cardstock.

2. Scissors
3. Glue
4. Ink pad
5. Water
6. Wood Cooking Skewer or Reed Diffuser

Image Hosting by PictureTrail.com

Step One:

Take a piece of paper and mist with water, you want the paper damp not wet.

Step Two:
Fold the paper three times into a square. Now cut a two inch petal with the scissors. When you cut this petal you will have six two inch petal.

Image Hosting by PictureTrail.com

Step Three:
Repeat step to with the exception of cutting two inch petals now cut one inch petals.


Step Four:
While the petals are still damp, crumble and twist the petals. Now slowly and carefully unravel and open the petals.

Image Hosting by PictureTrail.com

Step Five:
You will need to let the petals dry. If you are like me, I am inpatient so I used a heat embossing gun to dry each petal. If you use the heat embossing gun to dry the petals, grab the tip of one petal with a set of tweezers a gently run the heat embossing gun across each petal. If you hold the gun too long in one place it will burn the paper.

Step Six:
Begin inking the tips of the dried petal with the ink pad. I find that using two colors one darker than the other creates a more distressed look for the petals. Ink the tips and edges of all the one and two inch petals.

Image Hosting by PictureTrail.com

Step Seven:
The first layer, glue the six petals together. The top layer, glue the smaller petals just as you did in the first layer. Now to get the flower to pop up and develop the distressed dip in the middle, I place the flower on a soft surface (the best thing I have found is a soft mouse pad) Next take a rub on tool, I like Basic Grey’s rub on tool the best. Begin rubbing in a circular motion working from the center of the flower to the edge of each flower petal. The flower will begin to curve upward.
You can further distress the petals by inking the edges of the petals, by lightly brushing the ink pad over the whole flower.


Image Hosting by PictureTrail.com

Image Hosting by PictureTrail.com

Image Hosting by PictureTrail.com

Step Eight:
Now it is time to decide what to use as your center. In this example I used my distressed paper rose. For instructions on how to make the distressed rose check out either my blog http://suepup.blogspot.com/
or the tips and challenges in the forum section of PagesTime at http://pagesintimestoresite.ning.com/forum/topics/distressed-paper-roses.
If you do not want to add the distressed rose you could use any alternative center, like filigree brad, flower, rub on-the possibilities are endless.

Final result:

Image Hosting by PictureTrail.com

Image Hosting by PictureTrail.com

Image Hosting by PictureTrail.com

Handmade Paper Flower vine

Handmade Paper Flower Vine


Supplies

1. Floral tape
2. Floral wire any gauge 18 and above
3. Wire cutters
4. Paper flowers on wire stems
5. Paper leaves on wire stems

Image Hosting by PictureTrail.com

Step One:
You will need to cut three pieces of floral wire.
1st piece 10 inches
2nd piece 8 inches
3rd piece 6 inches

Step Two:
Decide where you want the vine to intersect. Once you decide, you will need to wrap the second and the third piece around the long 10 inch main vine piece.

Image Hosting by PictureTrail.com


Step Three:
This next step can be done two ways:
You can wrap the entire vine with floral tape.
Or
You can start adding the flowers to the bare wire. I prefer unwrapped, because I find the bare wire easier to work with.

Image Hosting by PictureTrail.com

Step Four:
Start wrapping the wire stemmed flowers and leaves to the main vine. Before you start wrapping, decide where you want the flowers and leaves placed on the vine. It is better to decide this now, once you get them wrapped on the main vine, it is hard to remove the items. Continue wrapping all the flower and leaves on the main vine. Once all the flowers and leaves are wrapped to the main vine gently start bending and arranging the leaves and flowers to you liking on the vine.

Image Hosting by PictureTrail.com

Step Five:
In this step you will begin creating the swirled vines.
Cut six pieces of floral wire at 6-8 inches long. Now wrap floral tape around each piece making sure to cover the entire piece, including the ends. Hint: if you pull and stretch the floral tape as you wrap it makes the floral tape stick to the project better.

Image Hosting by PictureTrail.com

Step Six:
Take all six pieces of wrapped wire and begin wrapping them around the skewer or diffuser reed. Hint: the skewer or diffuser reed is smaller in diameter creating a more delicate looking vine swirl.

Image Hosting by PictureTrail.com

Step Seven:
Now attach the swirls to the main vine using floral tape to connect them to the vine.

Image Hosting by PictureTrail.com

Final Step:
Now the wrap the entire vine with floral tape, remember to pull and stretch the tape as you wrap around the wire. Now you can gently rearrange the vine to your liking.

Image Hosting by PictureTrail.com

Final result:

Image Hosting by PictureTrail.com

Image Hosting by PictureTrail.com

Saturday, October 24, 2009

Monday, October 19, 2009

This is my first attempt at making roses, I was pretty happy with the end results. I will continue to work on perfecting the technique. This is a low cost solution to having beautiful flowers at hand for your scrapbook or craft projects. They are surprising easy to make and look amazing when completed. This is my first attempt at making distressed paper flowers. I took a stab my tearing apart a rose.

What you need...
To begin all you really need is some coffee filters, glue, paint, ink stamp, floral tape, small bead, acrylic paint, floral wire, paper punch, and scissors. The floral tape and stem wire are optional. The floral tape will help in adding and holding the completed flowers together.
Image Hosting by PictureTrail.com

Step One:Cut out a petal and crumple.
Wet the coffee filter and crumble the filter into a tight ball squeezing the water out of the filter. Once you have the excess water out of the filter smooth out the filter. Lightly brush the filter with paint and crumble the filter back into a tight ball. Place the ball in the microwave until dry. Smooth out the crumbled dry filter and begin punching or cutting out hearts. The crumpling makes the paper more pliable.
Image Hosting by PictureTrail.com


Step two: Wrap Bead
Fold the wire and thread the wire through the bead hole. Loop the wire around the bead and pull the wire through the bead until tight around the bead.

Image Hosting by PictureTrail.com Image Hosting by PictureTrail.com

Step three: Add glue.
Just add a small dab of glue to the bottom of bead adding one petal at a time. As you add the petals hold and pinch the flower to create the shape you want. Continue to add petals until you get the shape you want.

Image Hosting by PictureTrail.com Image Hosting by PictureTrail.com Image Hosting by PictureTrail.com


Step Four: Continue adding petals.
Add petals to create a flower that is as big and open or as small and budded as desired. Add as many petal as you feel are sufficient. You can be as creative as you want. Experiment until you get the shape and size you want. Bend, fold and roll the tips.
Image Hosting by PictureTrail.com

Step FiveSecuring the petals.
Pinch a little fold at the bottom of the paper to create a curved petal. Wrap a small piece of wire at the bottom to firmly secure the flower together. Now wrap the small piece of wire with floral tape. Use floral tape and wrap the bottom of the roses and the wire stem. A trick to getting floral tape to stick is pull the tape as you wrap the tape around the wire.
Image Hosting by PictureTrail.com

Step Six: Adding Leaves
Cut at least three leaves, I choose to keep mine in one piece and slide the leaves to the bottom of the rose and glue into place.
Image Hosting by PictureTrail.comImage Hosting by PictureTrail.com


Step Seven:
Finishing touches.
Gently pinching and rolling the petal as you pull downward. Use a toothpick to separate the layers and shape the rose. Once you have the rose shaped use the ink stamp to tip the edges of the rose.

Image Hosting by PictureTrail.com

Final Result:
Image Hosting by PictureTrail.com