Monday, October 17, 2011
Scraps of Darkness Blog RAK winner
Let me thank each one of you who helped make the Scraps of Darkness blog hop fun and successful!
The random winner was Dara Lynn. She was 26th to comment with the comment:
Dara Lynn said...
New follower ....happy dance... to finally see your creations on paper....always love your sketches...and I had to peek around elsewhere! Loooove the eery Time Ends page! It's Epic girlie! The Something Splendid page ....the bright orange and blacks...but still a softness....can it be???
Saturday, October 15, 2011
Scraps of Darkness Halloween Blog Hop
Scraps of Darkness
Halloween Blog Hop

Welcome to the Scraps of Darkness Halloween Blog Hop. The Scraps of Darkness Design Team has created some inspiring projects for this Halloween season. It's all tricks and techniques so join us on a jouney of darkness, hopping from blog to blog. Leave your comment on each blog in the hop in hopes of winning a prize.
Big prizes will be awarded at Scraps of Darkness and individual prizes on each Scraps of Darkness Design Team's blogs as well, so there are a ton of chances to win and you can even win more than once!! Our hop will run from the 15th through the 16th with winners being announced on Monday October 17th!!! !!
The Scraps of Darkness blog will be giving away two KITS as well as prizes being given out at each of our DT's blogs!! The chances of winning are huge and you can even win more than one prize!!!

Oh my, look at this Spooktacular prize that you could qualify to win from Scraps of Darkness.
To qualify to win the Scraps of Darkness prize, you must become a follower on the Scraps of Darkness blog and leave a comment on each Design Team Member's blog, including Scraps of Darkness. International and Domestic shipping will be provided for the Scraps of Darkness Prize!!
To qualify to win the prize on my blog, you must become a follower of my blog and leave a comment on each Design Team members's blog including Scraps of Darkness Blog. A random drawing will occur to determine the winner of the prize on my blog. Sorry, no international shipping for the individual drawing on the Pretty Pile of Paper Chaos. 
Individual Prize
Blog List:
Celina - http://scrapvamp.blogspot.com/
Jennifer - http://scrap-escape.blogspot.com/
Happy Hopping
Hello, Charlotte here and I wanted to share the layouts I created using October's "All Hallows' Eve kit from Scraps of Darkness. Love this kit so fun! You can create beautiful fall pages with this month's kit. If lean toward the dark side, you can create some spooktacular pages.
 Time Ends
Hello, Charlotte here and I wanted to share the layouts I created using October's "All Hallows' Eve kit from Scraps of Darkness. Love this kit so fun! You can create beautiful fall pages with this month's kit. If lean toward the dark side, you can create some spooktacular pages.


Time End Detail


The sketch LO " Quiet, Something Splendid"

Details of "Quiet, Something Splendid"


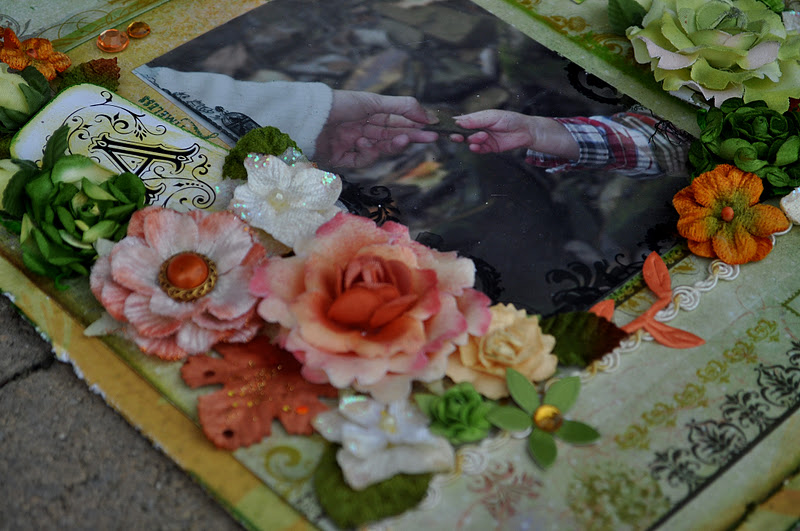
Oh Mother....
The next layout is for the Halloween Movie Contest sponsored by Scraps of Darkness. My favorite horror
film is "Psycho". I used photo from the original and modern film, however the original is my favorite. This movie freaked me out as a child. I hated to take a shower in a motel. Ugggg, that creepy Norman Bates. I used a piece of wax paper to try mimic a look of a shower curtain with a hand print, oh course a signature of the movie Psycho.


I love just how versatile October's kit is, you can go soft or really dark!

Detail


All Halllows' Eve Sketch
Your next Hop
Sunday, October 9, 2011
Trick or Treat Blog Hop
Welcome to the Trick Or Treat Blog Hop
October 8-10, 2011


Blog List:
Clearsnap http://clearsnap.blogspot.com
Crafter'sWorkshop http://www.thecraftersworkshop.com/The_Crafters_Workshop/Blog/Blog.html
Jaime Echt - www.thecraftersworkshop.com
Sabrina Alery http://sabrinaalery.blogspot.com/
Julie Fei-Fan Balzer - http://www.balzerdesigns.typepad.com/
Charlotte Jenkins http://suepup.blogspot.com You are Here
Mary Dawn Quirindongo -
Karen Grunberg- http://www.karenika.com/
Jennifer Priest http://hydrangeahippo.blogspot.com
Jen Clark - http://mycraftyfriendjen.blogspot.com/
Daniela Dobson http://danieladobson.blogspot.com/
Receive extra entries in the Hop for following us on Twitter and Facebook and for tweeting or posting on Facebook about the Hop - just post here afterwards that you have followed us or posted about the Hop to increase your chances to win. Happy Hopping!!!

Clearsnap Products
Other Products
Hero Arts Leaf Detail Stamp
Bazzil Basics Line Lime Crush Card stock
Hot off the Press Border Stamp
CPS Blog Sketch by Tami Mayberry
Directions
- Cut a 12 X 12 piece of Bazzil Basics Lime Crush Cardstock down to 10"X10".
- Cut a 12X12 piece of Orange card stock paper down to 11X11 and set the paper aside.
- On the 10X10 piece of card stock, ink the Leafy Border Molding Mat using ColorBox Stephanie Barnard Spearmint Dye Ink and stamp on the cardstock.
- When dry, stamp and emboss leaves using Top Boss Verdigris Embossing Powder randomly over the entire piece of card stock.
- Tape the 6X6 Crafters Workshop Balzer Design Mini Tri Mosaic stencil down over the left upper corner of the 10X10 piece of cardstock. Using the ColorBox Stylus Circle Tip, place Top Boss Watermark Embossing Ink to the collage's surface. Apply the ink using a gentle pounding motion, holding the Stylus straight up and down. Do not use a stroking motion. This motion will keep the ink from seeping under the edges of the stencil. If your stencil seems to be lifting as you ink, use an awl or chopstick to hold the stencil down as you apply ink. Repeat this process on the lower right corner of the 10X10 piece of card stock.
- Tap the Stylus Tips blending tool on the Colorbox Stephanie Barnard Dye Ink Pad to pick up a small amount of ink. Now using the Stylus Tips blending tool, blend the Dye ink into the paper. Make sure you blend the embossed area with more pressure to apply more ink around the heat embossed area created in the last step. This will create a stark contrast between the embossed area, which will resist the Dye Ink, and the inked area of the page.
- Aggressively run a paper distressing tool over the edges of the 10X10 page. Once the edges have been distressed with the tool, ink the edges with Chianti Colorbox Pigment Ink Brush Pad.
- Glue the 10X10 card stock onto the 11X11 orange card stock.
- Aggressively run a paper distressing tool over the edges of the 11X11 page. Once the edges have been distressed with the tool, ink the edges with Chianti Colorbox Pigment Ink Brush Pad.
- Cut a 5"X4" piece orange coordinating paper. Stamp the Stylus Leafy Border Molding Mat with Top Boss Watermark ink vertically down the paper. Sprinkle the image with Top Boss Verdigris Embossing Powder and emboss powder. Adhere the the paper to the 10X10 page.
- Place a double matte on the photo and adhere to the 10X10 card stock. Offset the matted photo on the page.

- Place a piece of ribbon vertically on the piece you create above in the last step.
- Cut a piece of 9"X1" tan card stock. Using a flourish stamp, stamp a horizontal border on the strip, using ColorBox Stephanie Barnard Tangerine Dye Ink.
- Cut a 9 1/2"X1 1/2" piece of coordinating orange card stock. Adhere the tan piece of card stock onto the orange card stock
- Cut a 3 X 3 piece of tan card stock, ink a sentiment stamp using ColorBox Stephanie Barnard Spearmint Dye Ink and stamp on card stock. When dry, ink edges using Chalk Inks.
- Cut a 3 1/2X3 1/2 piece of orange cardstock. Adhere the piece you made above to the orange square. Adhere a yellow rhinestone to the left lower corner and upper right corner. Stamp a corner flourish and fussy cutout the image and adhere to the upper left corner of the photo.

- Cut a 21/2X 6" piece of tan paper, ink a leaf stamp with ColorBox Stephanie Barnard Spearmint Dye ink. Stamp the image on the tan paper. Ink a small leaf stamp with ColorBox Stephanie Barnard Tangerine Dye Ink and randomly stamp over the green leaves.
- Cut the piece above down to 4". Add an orange title. Ink the edges of the tan card stock, using chalk inks. Mat the title square with a coordinating orange piece of card stock and adhere to page.

- Using the 2' remnant from the piece above, stamp a sentiment and adhere behind the right corner of the photo.
- Place butterfly and glitter brads to the page.
- Adhere the 11X11 piece to a 12X12 piece of Bazzil Basic Lime Crush card stock.
- Aggressively run a paper distressing tool over the edges of the 12X12 page. Once the edges have been distressed with the tool, ink the edges with Chianti Colorbox Pigment Ink Brush Pad.
- Using a short sentiment stamp, ink the stamp with ColorBox Stephanie Barnard Tangerine Dye Ink and stamp the sentiment around the border of the 12X12 piece of card stock.
Saturday, October 8, 2011
Trick Or Treat Blog Hop
October 8-10, 2011

Crafter's Workshop and Clearsnap have teamed up for the next three days to create hauntingly inspiring projects for this Halloween season. It's all tricks, treats, and techniques so join us on a fright night jaunt to remember, hopping from blog to blog. Leave your "Trick-or-treat" comment on each blog in the hop in hopes of winning candy, blog candy that is! For every 50 comments posted on this blog we're giving away a set of inks and accessories to spook up any crafter's projects!!! We'll choose the winners from the blog comments posted on all the blogs in the Hop. The prize includes Smooch Spritz in Frosted Grape, Green Olive, and Carrot Cake, ColorBox Pigment InkPad in Spooktacular, Glitter in Grape Fizz, Design Adhesives in "Trick or Treat" and "Eeeeks!?", plus our new Design Foils in Lime Burst. That's alot of spook to go around!
Blog List:
Clearsnap http://clearsnap.blogspot.com
Crafter'sWorkshop http://www.thecraftersworkshop.com/The_Crafters_Workshop/Blog/Blog.html
Jaime Echt - www.thecraftersworkshop.com
Sabrina Alery http://sabrinaalery.blogspot.com/
Julie Fei-Fan Balzer - http://www.balzerdesigns.typepad.com/
Charlotte Jenkins http://suepup.blogspot.com You are Here
Mary Dawn Quirindongo -
Karen Grunberg- http://www.karenika.com/
Jennifer Priest http://hydrangeahippo.blogspot.com
Jen Clark - http://mycraftyfriendjen.blogspot.com/
Daniela Dobson http://danieladobson.blogspot.com/
Receive extra entries in the Hop for following us on Twitter and Facebook and for tweeting or posting on Facebook about the Hop - just post here afterwards that you have followed us or posted about the Hop to increase your chances to win. Happy Hopping!!!

Clearsnap Products
Other Products
Mod Podge
Crafter's Workshop Love Beads Stencil
Crafter' Workshop Henna Hand Stencil
Joann Fabric Holiday Decorations
Stephanie Barnard Stamp of LifeSpooky2Scare Stamp
Liquitex Gesso
Orange Twist Deco Art Americana Acrylic Paint
E-Z Form Plaster Cloth Wrap
Directions
- Cover your work area with a drop cloth, this is messy but fun! You will need an old container to place the warm water in for dipping the plaster strips.
- Remove the plastic handle of the pumpkin. I cut the handle in half and pulled the handle through the hole.

- Cut the plaster cloth into 7 strips, approximately 14 inches long.
- Fill a medium bowl 1/2 full with warm water. Dip the strips into water one at a time and run fingers downward to thoroughly wet the strip. Turn the pumpkin upside down. Wet a 14" strip, starting at the center of the bottom, bring the strip down the side of the pumpkin and over the top, smoothing the strip as you go. Smooth out the air pockets and wrinkles with your fingers.
- Flip the pumpkin right-side up and fold the ends of the strips over the lip of the opening at the top. Trim the strip ends so that about 1" folds to the inside of the pumpkin, and smooth the ends against the inside wall.

- Continue adding strips around the pumpkin, overlapping the strips by 1/4 covering everything but the face. Dip the 14" strip halfway into the water. Starting at the bottom of the pumpkin, in the middle of the face, bring the strip up from the bottom and tuck it into the crevices of the mouth. Add several strips in the same manner to cover the width of the mouth.
- After the bottom of these strips has started to dry and conform to the mouth shape, wet the top half of the strips and cover the top of the mouth and eyes on the same manner.
- While the pumpkin is still damp and pliable begin defining and smoothing the pumpkins eyes, nose's and mouth's crevices with your fingers.

- Wipe out the inside of the pumpkin with a damp cloth to remove plaster.
- While the plaster is damp to the touch, peel the ends of the strips away from the inside of the pumpkin, trim them make them even and tuck them back inside to give the edge a neater, finshed look.
- Paint the entire surface of the pumpkin with orange paint. Make sure the paint gets in the textured surfaces. The plaster really soaks up the paint, so do not use an expensive paint to cover the pumpkin.
- Once the orange paint dries, antique the pumpkin by applying a thin layer of ColorBox Tangerine Stephanie Barnard Dye Ink using the ColorBox Stylus Tool.


- Paint the eyes and teeth white. I used a white canvas gesso to paint these areas.

- Paint the mouth, I choose an orange color and extend the mouth color beyond the original mouth, rounding the corners to give it a more vintage look. Using a small paintbrush start building more details by painting the mouth area with Smooch Molasses Accent Ink, Smooch Tuxedo Accent Ink and ColorBox Leather Mix'd Media Inks.

- To create the eye, I used the ColorBox Circle Stylus Pad. Tap the Circle Stylus Tip Tool on the ColorBox Blueberry Stephanie Barnard Dye Pigment Ink Pad to pick up a large amount of ink. Now using the Circle Stylus Tip, press the Stylus tip in the center of the eye. Paint another small white circle with the white gesso. Add a small black circle and build the outline and details with Smooch Molasses Accent Ink. Using a small paintbrush, I start painting more details on the face using Smooch Molasses Accent Ink and ColorBox Leather Mix'd Media Inks.
- Tape the Crafters Workshop 6X6 Swirly Vines stencil down to the pumpkin. Using the ColorBox Stylus Circle Tip, apply Stephanie Barnard Licorice ColorBox Dye Ink to the collage's surface. Apply the ink using a gentle pounding motion, holding the Stylus straight up and down. Do not use a stroking motion. This motion will keep the ink from seeping under the edges of the stencil. If your stencil seems to be lifting as you ink, use an awl or chopstick to hold the stencil down as you apply ink. I stenciled this on several areas on the pumpkin, stencil as many flourishes until you are happy.


- You will need to create two 12X12 or one 24X24 collage.

- Apply a thin layer of ColorBox Silver Foil Smooch Spritz over the entire collage. Gently shake the Silver Foil Smooch Spritz to make sure the mica is mixed completely with the ink. Holding your Smooch Spritz just a few inches from the inked paper, spray and coat the paper with a layer of Smooch.
- Using a permanent felt tip marker outline the stencil design.

- Brush a thin coat of Glue Gloss on several of the blocks within the Crafter's Workshop Love Beads Stencil. Sprinkle the Top Boss Sparkling Amethyst Glitter onto the Glue Gloss. Using a small paint brush, gently brush the glitter over the entire stencil block. Repeat this several times, filling in several blocks using the Amethyst Top Boss Glitter. When you are finished, carefully lift the stencil from the collage. Carefully lift the picture collage and hold it perpendicular to your work surface. Gently tap the edge of the collage to remove any loose glitter.

- Once the collage surface is dry, add additional color with ink. Do some stamping on the collage's surface I used the Stephanie Barnard Stamp of LifeSpooky2Scare Stamp, Doll Faces and WordsWords Jumbo Design Wheel. Tape the 12X12 Crafters Henna Hands stencil down over the collage and stencil the image on the collage using ColorBox Wicked Black Archival Ink.
- To enhance several areas of the collage, apply Pumpkin Smooch Accent Ink inside the stencil blocks and circles. Using the Lettuce Smooch Accent Ink and Tuxedo Smooch Accent Ink randomly apply the Lettuce Smooch on stencil design.
- Cover the entire surface of the collage with a cloth and apply a hot, dry iron with heavy and even pressure.

The Witch Hat Construction
- Draw a half circle on the edge of a piece of the collage of 12 inches in diameter using a mathematical compass and pencil. Cut out the half circle and roll it into a cone roughly the size of the opening of the pumpkin.
- Place the cone on the pumpkin, and tighten or loosen the cone to fit; the cone can be stapled or taped into position. Apply glue to the seam of the cone, and press down from the inside of the cone to form a bond between the pieces of collage paper.
- Measure the inside diameter of the cone using a ruler, and mark the diameter on the second piece of collage paper; the center point of the diameter should also be marked. Using the mathematical compass, draw a circle for the inside of the brim; a second circle should be drawn wider than the first for the outside edge of the brim
- Cut out the outer and inner edges of the collage paper, and place the cone on top of the brim to make sure it fits. Spread glue on the inside edge of the brim before placing the brim over the top of the cone; the glued area of the brim should be pressed against the edge of the cone.
- Allow the brim to dry onto the cone of the witch’s hat, and decorate the hat as required. I added Halloween Garland, Halloween Tag, Ribbon and lace around the brim.


Subscribe to:
Posts (Atom)