This is a photo of my mother and her aunt, they are teenagers in this photo and best friends. My mother (R) is 17 years old in this photo. The photo was taken on my great-grandparents farm. My mother hates this photo because everyone teases her asking what were you drinking? My mother swears they happen to all find empty bottles and posed for the photo...right. No one bought the story 62 years ago, and I "ain't" buying the story today....lol.
I used the awesome kit "Passages" from Scraps of Darkness. I am in love with this kit...I am so sad that this kit is gone.
Wednesday, October 5, 2011
Sarah's and Lucy's Secret
This is my first attempt at box art. I have always been drawn to Joesph Cornell's boxed art, so I finally gave it a try. I loved creating this piece. I picked the box up at a locate thrift store and converted the box to fit my needs. The box is my personal story of my mother's maternal side of the family. The two big photos are of my great-great grandmothers Sarah and Lucy. The smaller photos are photos of my g-grandparents throughout different stages of their lives.
The top left square: Old teabags. Whenever I see old dried teabags they remind me of the wrapped medicine remedy bags used for healing.
Top Middle: Feathers, cornstalks and corn encased in wax. Symbols of NDN/Melungeon heritage.
The top right: A teaball. I happen to come accross this teaball one day long ago in an antique shop. I thought the design and color was beautiful, so I bought it. I have had the teaball stored away waiting for the right project.
The bottom left: A saltshaker I bought at an antique store. I thought the rusting and patina were so stunning.
The middle bottom: Wood and deer. The wood is from West Virginia. My family migrated from Delaware to West Virginia. The deer were and still are a big part of many of our family's diet-sacred animals.
The bottom right: Rusted shovel and coal. A occupation for many of my family members..I am a coal miner's daughter and granddaughter to a Redneck.
The bark wrapped around the photo: GGgrandmother Lucy was a well known medicine woman.
I lined the the interior and exterior box with paper and placed several layers of heavy wax over the entire box for a more vintage look. The wire was something I found in an old construction yard walking my dog a few months ago.
I used the "Passages" kit from Scraps of Darkness. This was the last bits of the kit. I loved the kit so much, I did not want the final pieces to go to waste. I loved using this kit and I am very sad that the kit has been completely used.......fabulous kit!
Top Middle: Feathers, cornstalks and corn encased in wax. Symbols of NDN/Melungeon heritage.
The top right: A teaball. I happen to come accross this teaball one day long ago in an antique shop. I thought the design and color was beautiful, so I bought it. I have had the teaball stored away waiting for the right project.
The bottom left: A saltshaker I bought at an antique store. I thought the rusting and patina were so stunning.
The middle bottom: Wood and deer. The wood is from West Virginia. My family migrated from Delaware to West Virginia. The deer were and still are a big part of many of our family's diet-sacred animals.
The bottom right: Rusted shovel and coal. A occupation for many of my family members..I am a coal miner's daughter and granddaughter to a Redneck.
The bark wrapped around the photo: GGgrandmother Lucy was a well known medicine woman.
I lined the the interior and exterior box with paper and placed several layers of heavy wax over the entire box for a more vintage look. The wire was something I found in an old construction yard walking my dog a few months ago.
I used the "Passages" kit from Scraps of Darkness. This was the last bits of the kit. I loved the kit so much, I did not want the final pieces to go to waste. I loved using this kit and I am very sad that the kit has been completely used.......fabulous kit!
Saturday, September 24, 2011
Cinderella's Envy
Hello Everybody! Charlotte here with a project using Smooch Spritz, Stephanie Barnard ColorBox Premium Dye Ink, Smooch Pearlized Accent Ink, Designer Foil, ColorBox Pigment Ink, Designer Adhesive and the Rollagraph Design Wheel. The name of the project is,"Cinderella's Envy". A couple weeks ago, I walked into a vintage thrift store and when I came to the shoe rack, a pair of pink stilettos caught my eye. I knew immediately that these shoes would end up being altered, and turning into fabulous pair of
stilettos that even Cinderella would envy!
Here is the tutorial on how to make these shoes. http://clearsnap.blogspot.com/2011/09/cinderellas-envy.html
stilettos that even Cinderella would envy!
Here is the tutorial on how to make these shoes. http://clearsnap.blogspot.com/2011/09/cinderellas-envy.html
Sunday, September 18, 2011
Scraps of Darkness "Passages" September Kit
Somewhere ages and ages hence:
Two roads diverged in a wood, and I,
I took the one less traveled by,
And that has made all the difference."
~ Robert Frost ~
Here is what you'll find in our newest kit:
*4 double sided papers from Bo Bunny's Etc. Collection and 6 double
sided papers from the World Traveler Collection by Teresa Collins
*12x12 Chipboard from the Etc. Collection by Bo Bunny
*Doily Flowers by Jenni Bowlin
*World Traveler Trims by Teresa Collins
*Prima Brick Wall clear stamp
*Prima Toggle - Bobbins
*2 Cork disks
*Vintaj Arte Metal Bric-A-Brac
*A fabulous new sketch by Suepup, created just for our Passages kit
We're sure you will love this beautiful collection as much as we do.
Click here to see the beautiful creations our Design Team did with this kit!
"Their Bond"
Monday, September 5, 2011
Clearsnap Proud to be Made in the USA Blog Hop
Proud to be MADE IN THE USA Blog Hop
Did you know that all Clearsnap Products are manufactured right here in the United States, at our headquarters in Burlington, WA? They are! Every inkpad is made right here under our loving, careful guidance so that it will be the best quality possible when it reaches your craft table (and for years to come). To celebrate Clearsnap's commitment to manufacturing products in the USA we have released a Limited Edition 3 Color Pigment Inkpad, MADE IN USA. Our Design Team has created stunning projects with this inkpad to share with you today, Labor Day! This inkpad has only been available to retailers purchasing inkpads and distinctive accessories direct from Clearsnap, as a "thank you" for their support of our company.
Cathie Allan http://canadianscrapbooker.ca/cathie/
Robyn Weatherspoon http://robynweatherspoon.blogspot.com/
Stephanie Ackerman http://stephaniescraps.blogspot.com/
Tami Sanders http://tamisanders.com/
Charlotte Jenkins http://suepup.blogspot.com/ You are Here
Daniela Dobson http://danieladobson.blogspot.com/ Next
Sabrina Alery http://sabrinaalery.blogspot.com/
Jean Okimoto http://davebrethauer.typepad.com/inkollage/
Mary Dawn Quirindongo http://mypinkmexico.blogspot.com/
Jennifer Priest http://hydrangeahippo.blogspot.com/
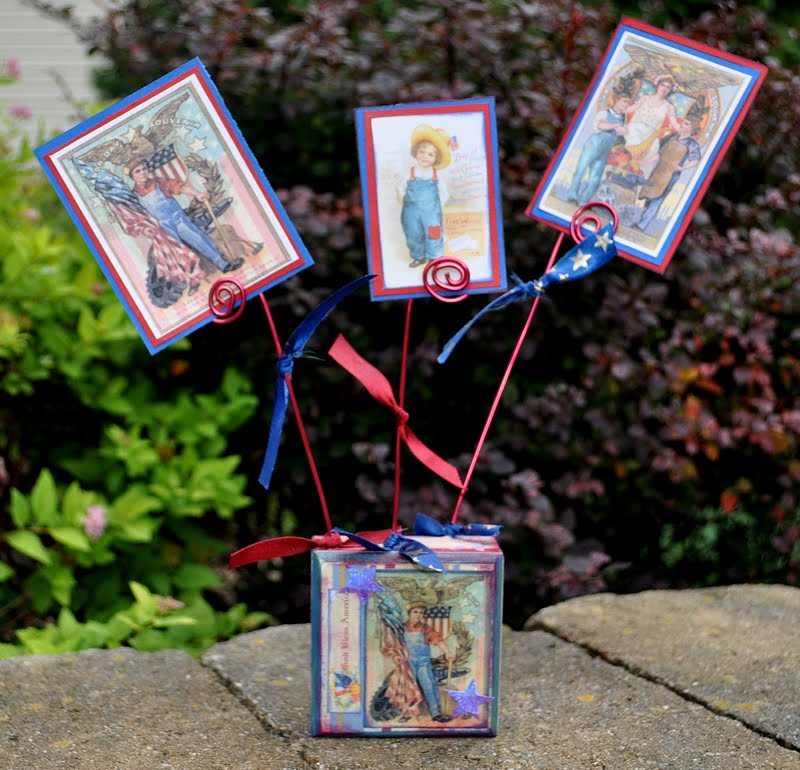
I dedicate this project to all the men and women who helped build the American Dream. I want to he honor all those who fought for rights of workers in America. Many generations later, were are still benefiting from the fruits of their labor, eight-hour workday, Social Security, health insurance, unemployment and disability insurance, occupational safety standards, fair wages and decent working conditions – labor fought to win these protections for all Americans.
Front
Back
Directions
- I surfed the Internet for some vintage images. I reduced the images to 2 1/2 X 2 1/2 and printed the images on my printer. Use scissors or a craft knife to cut out the image.
- Make sure the wood block you are decorating is clean and dry, fill in deep gouges, and sand it down to remove bumps and imperfections if necessary. If you want to paint it or refinish it, you should do this before pasting anything onto it. I primed the surface with a coat of acrylic paint to help the cut-outs stick better.
- Use a paintbrush to brush a thin layer of Mod Podge onto your surface and onto the backs of the cut-outs. Make sure you apply the Mod Podge evenly and over the edges of the cut-outs
- Ink the edges of the images with red a blue ColorBox Pigment Ink Pad.
- Using a star stamp, stamp six blue stars with ColorBox Pigment Ink
- Lay a piece of your cut paper image onto the area to which you applied the Mod Podge. Apply the paper carefully to avoid bending or crumpling it, and smooth it out with an old plastic gift card or with your finger, rubbing outward from the center. Repeat with each piece. For a more complex appearance, make several layers of cut-outs.
- Make sure the whole piece is thoroughly and completely dried before proceeding. If you are applying several layers, make sure each layer is dry before starting on the next.
- Seal the decoupage with a couple coats of Mod Podge. Let each coat dry thoroughly before moving to the next step.
- When the Mod Podge is dry, sand it with 400 grit sandpaper to remove imperfections. Use a damp cloth to remove residue from sanding. For this project, I lightly sanded the project because I wanted to keep some of the imperfections and brush marks.
- Using a drill, drill three 7/64 small holes in the top of the block.
- Distress the edges of the finished block's edges with Blue ColorBox Pigment Ink
- Using 20 gauge wire, wrap one end of the wire around a wooden skewer three times, creating a spiral. Gently remove the skewer and repeat this process two more times.
- Apply craft glue into the three drilled holes and place the non-spiral end of the wire into the drilled hole. Repeat process for all three pieces of wire. Let dry before moving to the next step.
- Cut and tie ribbon randomly on the wire pieces.
- Cut and mat three images, make sure the images are double sided so you can display this project "in the round"-basically 360 degrees.
Place the matted images in the wire holders.
You have a vintage project to decorate for Labor Day or any occasion.
Clearsnap Products
Made in USA ColorBox Pigment Ink PadOther Products
12 Timbers Wood Block
Lil' Stamps Inque Boutique Stamps
Dog Words Paper Making Memories
Offray Star Ribbon
Mod Podge
Tuesday, August 23, 2011
Summer Fun Blog Hop Clearsnap and Scor-Pal
Welcome to the
Clearsnap
and
Scor-Pal
and
Scor-Pal
Summer Fun Blog Hop 2011!!
Our lovely Design Teams have created some wonderful summer fun projects with the Scor-Pal, brimming with inspiration and of course lots of Clearsnap inks! Visit each Design Team member's blog to see what inspiring projects they have to share. Leave a comment on each blog. We'll choose one winner from all of the comments posted to receive a prize pack from Clearsnap and another from Scor-Pal.
Scor-Pal Blog http://scor-pal.blogspot.com/
Mary Dawn Quirindongo http://mypinkmexico.blogspot.com
Diane Zechman http://papercookies.blogs.splitcoaststampers.com/
Sabrina Alery http://sabrinaalery.blogspot.com/
Gini Cagle http://ginicagle.blogspot.com
Jean Okimoto http://davebrethauer.typepad.com/inkollage/
Lisa Andrews http://scrappingwithlisa.blogspot.com
Daniela Dobson http://danieladobson.blogspot.com/
Katie Tate http://bothsidesofthepaper.blogspot.com
Charlotte Jenkins http://suepup.blogspot.com/ You are Here
Stephanie Ackerman http"stephaniescraps.blogspot.com Next
Tami Sanders http://tamisanders.com/
Robyn Weatherspoon http://herebygrace.typepad.com/here_by_grace/
Tami Mayberry http://tamimayberry.blogspot.com
Jennifer Priest http://hydrangeahippo.blogspot.com/
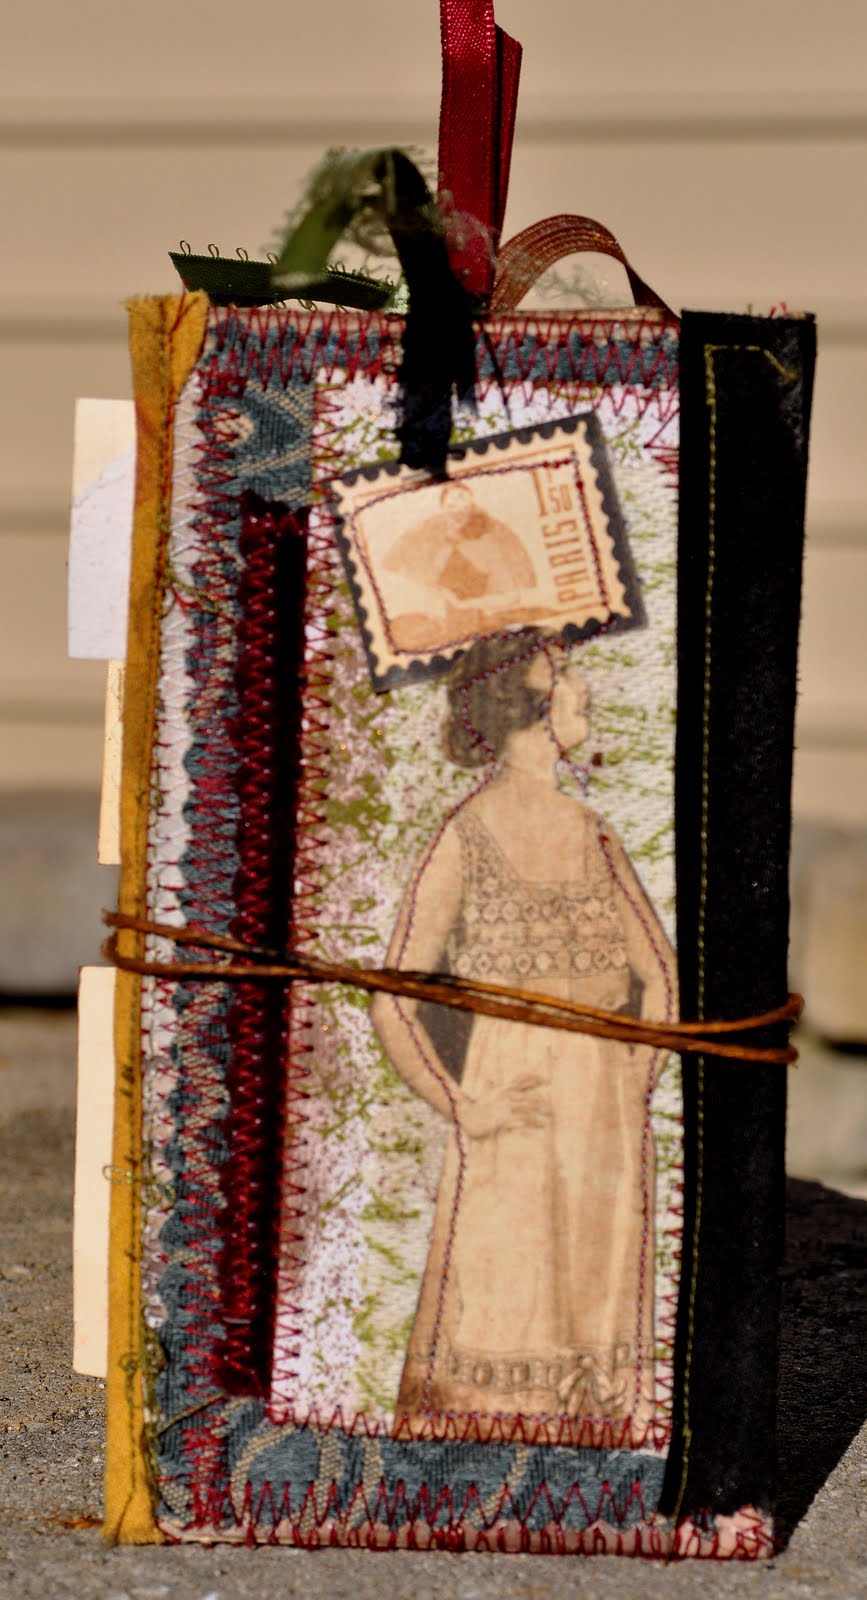
Today I am sharing with you how to create " A Manila Folder Journal", using ColorBox Ink, Smooch, Smooch Spritz, Top Boss Embossing Powder and the Scor-Pal.
Front Cover
Back Cover
Whether you want to keep a craft journal, travel journal, family journal or just make a journal for every week of the year, this journal is perfect.Clearsnap Products
ColorBox Artichoke Dye Ink Stephanie Barnard Ink Pad
Top Boss Black Embossing Powder
Top Boss Watermark Ink Pad
ColorBox Chianti Pigment Ink Pad
ColorBox Truffle Mix'd Media Inx Pad
ColorBox Honey Mix'd Media Inx Pad
ColorBox Leather Mix'd Media Inx Pad
ColorBox Black Pigment Ink Pad
Log Cabin Smooch Spritz
Rollagraph WordsWords Stamp Wheel
Rollagraph Jumbo Handle
Molasses Smooch
Other Supplies
Scor-Pal
Offray Olive Ribbon
Robert Stanley Ribbon
Beadery Twine
Sookwang Score Tape
Hampton Art "Key Yo My Heart" stamps
Crafter's Pick Glue
Transfer Magic Ink Jet Transfer Paper
Joann Craft Essentials Vintage Keys
Domestic Goddess " Lady of the House"
Graphics 45 paper
Making Memories "Noteworthy" Spiral NotebookCircle Of Love Close to My Heart Stamp
Timeless Close to My Heart Stamp
Directions
- Open a manila folder and lay flat on the Spor-Pal and score a line 3" up from the bottom, creating a horizontal fold line.
- Using the Scor-Pal mark and score the folder vertically into (4) 3" wide sections. Do not calculate the tabs with measuring and scoring.
- Crease the folder at each of the scored line. Fold along the horizontal line to create the pockets, and then fold on the vertical lines.
- Cut the paper to cover your folder. You will need eight 3" scored and cut paper pieces to cover the vertical sections inside and outside the folder.
- Tack the eight pieces of paper to the folder and then fold the pocket flap up.
- Using the Scor-Pal, score and cut eight 3X3" pieces of paper for the pockets. I used coordinating vintage paper to create consistency throughout the journal.
- Open the folder flat. Using the sewing machine, stitch along the perimeter of both pocket's side and page side of the folder. I used two different coordinating colors of thread and used a variety of machine stitches.
- Fold the pocket section back in place, and then fold the two middle pages together to make one center page. Stitch round the outer edge of the cover and the new center page.
- Run the Colorbox Truffle Mix'd Media ink along the edges of the folder to distress any areas where you can see the folder peeking through.
- With the folder opened flat, cover-side up, lay the spine strip in position in the middle if the back of the folder. Sew down the length of 1 side of the spine strip.
- Close the folder and fold the spine strip over the fold. Open the folder slightly, letting the spine strip move a little to allow some give for opening and closing the folder. Holding the strip in place, and then stitch the second side of the spine strip in place.
- Now start adding the embellishments inside and outside of the journal. Use old books, photos and vintage papers. Do some stamping, embossing and add some color using inks.
- Using the Scor-Pal, score and cut (4) 2" pieces of cardstock for the journal cards.
- Using the Scor-Pal, score and cut (4) 2" pieces of coordinating paper to cover the cardstock. You can cover both sides of the cardstock or just one.
- Glue the paper to the cardstock.
- Stitch around the whole card to match the journal.
- Spray with Log Cabin Smooch Spritz to add to the vintage look.
- Do some stamping and add photos. For the photos, I used Transfer Magic and transferred the photos to fabric.( Follow the transfer magic directions)
- Punch holes, add eyelets and thread the ribbon through the eyelets of the journal cards.
- Add decorative stitching and outline the photos with Molasses Smooch.
I am sharing another project with you, "Vintage Paper Business Card Holder" using ColorBox Mix'd Media Inx, Molding Mat and the Scor-Pal.
Clearsnap Products
ColorBox Truffle Mix'd Media Inx
ColorBox Dark Brown Fluid Chalk
ColorBox Olive Pastel Fluid Chalk
ColorBox Glacier Lake Archival Dye Ink Pad
Other Suppplies
Scor-Pal
Beadery Twine
Sookwang Score Tape
Graphic 45 Staples Metal Flowers
Oriental Trading Antique Vintage Brads
Ciao Close to My Heart Stamp
I want to share another another project I created, "Celebrating Summer Fun Box" using Smooch Spritz, ColorBox Pigment Ink, ColorBox Archival Dye Ink, Cat's Eye Fluid Chalk Queue, Stylus Molding Mat and the Scor-Pal.
Clearsnap Products
Spot Stylus Molding Mat
Cherry Ice Smooch Spritz
ColorBox Turquoise Ink Pad
ColorBox Made In USA Ink Pad
ColorBox Wicked Archival Dye Inkpad
Cat's Eye Chocolate and Blueberries Fluid Chalk Queue
Other Products
Scor-Pal
Summer Wishes Close to My Heart Stamp
Summer4Fun The Stamp of Life
Colorbok Twill
Zots
Sookwang Score Tape
Oriental Trading Bright Rainbow Craft Buttons
Friday, August 19, 2011
Thank You from Clearsnap
Thank You for your support of Clearsnap Products!
Clearsnap proudly manufactures all of our inkspads in the United States.www.clearsnap.com
"Moments" Scrap of Darkness
This is a gift for a friend. This is a photo of here and her daaughter. I used the Scraps of Darkness August kit, "Envy"
This month Scraps of Darkness is going green! In our Main Kit, you'll find gorgeous greens with accents in pink and blue.
Ancestors
This is a photo that is hard to explain. The easiest way to explain-my 6th generation aunt and uncle present in this photo. My family married one of Kate's brothers and one of Kate's sisters on different sides of the family. I believe the photo is dated around 1770. My family is Melungeon. Kate in this photo is Lenape Indian. My family is a mixture of Dutch, Irish, Germany, English, Haitian, Portuguese, Welsh,Cherokee and Lenape. The majority of my family originated from the lost colony of roanoke. I used the Scraps of Darkness August kit, "Envy"
The few who do are the envy of the many who only watch."~ Jim Rohn ~
This month Scraps of Darkness is going green! In our Main Kit, you'll find gorgeous greens with accents in pink and blue:
*4 double sided papers from Kaisercraft and 6 patterned papers from The
*Robin's Nest for a total of 10 sheets of patterned paper
*Flowers by Petaloo
*Miniature roses by ZVA Creative
*Bling flourishes by ZVA Creative
*Rub Ons by The Robin's Nest
*Mistables Journal Tags by Pink Paislee
*Glitter brads by Making Memories
*Sheer green ribbon
*Versa Magic Chalk Ink
*Silk fern leaves
We're sure you will love this beautiful collection as much as we do.
Click here to see the fabulous creations our Design Team did with this kit!
http://scrapsofdarkness.com/Forum/index.php?action=gallery;cat=17
This month Scraps of Darkness is going green! In our Main Kit, you'll find gorgeous greens with accents in pink and blue:
*4 double sided papers from Kaisercraft and 6 patterned papers from The
*Robin's Nest for a total of 10 sheets of patterned paper
*Flowers by Petaloo
*Miniature roses by ZVA Creative
*Bling flourishes by ZVA Creative
*Rub Ons by The Robin's Nest
*Mistables Journal Tags by Pink Paislee
*Glitter brads by Making Memories
*Sheer green ribbon
*Versa Magic Chalk Ink
*Silk fern leaves
We're sure you will love this beautiful collection as much as we do.
Click here to see the fabulous creations our Design Team did with this kit!
http://scrapsofdarkness.com/Forum/index.php?action=gallery;cat=17
Saturday, August 13, 2011
Vintage Raised Chipboard Background
Hello Everybody! Charlotte here with a technique using Smooch Spritz, ColorBox Mix'd Media Inx, ColorBox Pigment Inks and the ColorBox Petal Point Option Pad. The name of the technique is " Vintage Chipboard Background".
I am so excited to share my first project using the new Donna Salazar signature line of Mix'd Media Inx. If you love using Colorbox Pigment Inks to distress paper or create Mixed Media art, Mix'd Media Inx are perfect for your projects!
Here is a video on how to make this "Vintage Chipboard Background". Hope you enjoy.
Here is the link.http://clearsnap.blogspot.com/2011/08/vintage-raised-chipboard-background.html
I am so excited to share my first project using the new Donna Salazar signature line of Mix'd Media Inx. If you love using Colorbox Pigment Inks to distress paper or create Mixed Media art, Mix'd Media Inx are perfect for your projects!
Here is a video on how to make this "Vintage Chipboard Background". Hope you enjoy.
Here is the link.http://clearsnap.blogspot.com/2011/08/vintage-raised-chipboard-background.html
Subscribe to:
Posts (Atom)